
How to Create an Easy Embossed Grid Background for Mixed Media Art
- Heather McClelland
- Mar 8
- 4 min read
Want to add easy texture to your mixed media projects? This embossed grid technique is simple and fun!
This tutorial will show you how to emboss grid lines onto cardstock and enhance them with ink for a stunning background effect.

This technique is a simple yet powerful way to create custom, textured designs without needing embossing folders or expensive tools!

Scoreboard & Score Tool or a DIY method (see how below)
Ink Pads
Spray Inks for an Alternative Method
Tutorial:
Start by using the scoreboard and tool that comes with it.

Place a piece of heavy cardstock on top of the scoreboard. You can keep the paper straight so the embossed lines are parallel to the edge or you can turn the paper at an angle for horizontal lines.
Use the scoring tool to make lines in the paper.
I chose to make the lines half an inch apart on this paper but you can get creative with the spacing.⭐️
Embossed lines without a scoreboard:
Ruler & Bone Folder (or Stylus, Empty Pen)
🔹 Place your cardstock on a self-healing mat, a mouse pad, or a stack of paper for a bit of cushion.
🔹 Use a ruler to guide your lines and press down with:
• A bone folder
• A stylus (like one for shaping clay or dot painting)
• An empty ballpoint pen (no ink)
• The back of a butter knife (blunt edge only)
💡 Tip: If your ruler tends to slip, use washi tape or painter’s tape to hold it in place while scoring.
Rotate the cardstock to make a grid pattern
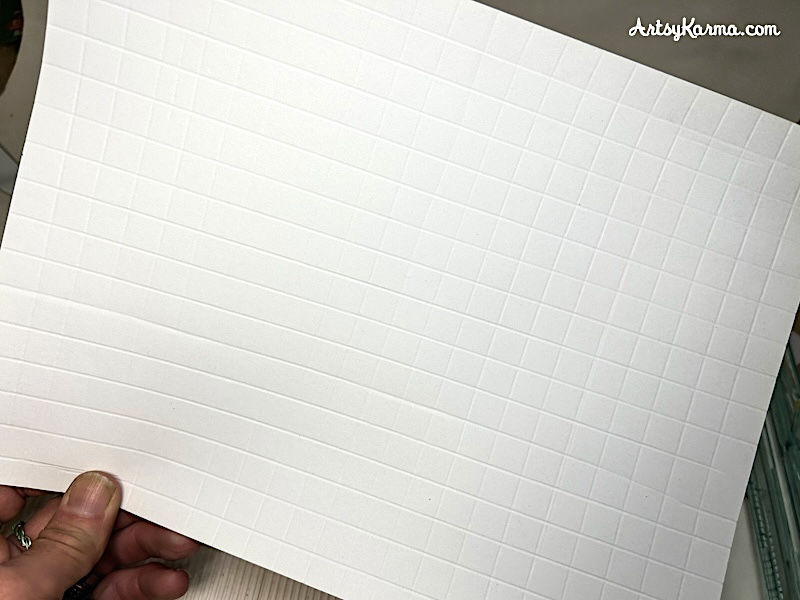
You can rotate the paper to make a perfect grid like above or get creative with this part too.
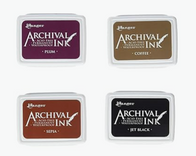
Run an ink pad over the cardstock

Gently run an ink pad across the cardstock so the lines appear white due to the ink not getting in them.
I chose to use two different colors on my paper using archival ink:

I also tried it with different types of distress ink pads:

Idea: Adding spray inks
Before embossing use ink sprays to color the cardstock:

I used two different purple-colored spray inks.
Flip cardstock over and emboss the grid lines:

Instead of embossing the cardstock so the lines go in, flip it over so the lines come out on the inked side.
Use pigment inks to just ink the raised lines:

You'll have to run the ink pad lightly across the top to mostly ink just the embossed part but it also looks cool when you get some within the lines. Gives it a grudge-like appearance.
If the color of ink sprays you use is a darker shade, pigment inks works better to show the actual ink color because they're more opaque.

An example using lighter shades of pearlescent watercolors instead of spray inks:


✅ Troubleshooting & Pro Tips for Embossed Grid
The embossing lines aren’t showing up well
Possible Cause: Your cardstock might be too thick or too smooth.
Fix: Use medium-weight cardstock (around 80-100lb) that has some texture. If your paper is too smooth, try lightly misting it with water before embossing—it softens the fibers and makes deeper impressions
Ink isn’t catching on the embossed lines
Possible Cause: The pressure from scoring wasn’t deep enough.
Fix: Make sure you are applying firm, even pressure with your embossing tool. If needed, go over the lines twice. Also, try using a softer ink applicator (like a foam blending tool) to highlight the raised areas without pressing ink into the grooves.
The ink is smudging too much and hiding the grid pattern
Possible Cause: Too much ink or using a very wet ink pad.
Fix: Use a dry or semi-dry ink pad rather than a juicy one. Try dabbing instead of rubbing to avoid filling the embossed grooves.
✅ Ideas how to use background
Bookmarks, Tags, or ATCs (Artist Trading Cards)
Small projects like bookmarks and ATCs are a fantastic way to use leftover pieces of embossed backgrounds. These mini artworks are fun, quick to make, and great for swaps or gifts.
✨ How to Use:
Cut the embossed paper into bookmark or tag shapes, ink them, and add embellishments.
Layer stamped images, stickers, or rub-ons over the grid.
Add a hole punch and ribbon for a decorative bookmark.
Use gold, silver, or black ink to highlight the raised areas for an elegant contrast.
Junk Journals & Mixed Media Panels
Embossed backgrounds work beautifully in junk journals, adding tactile interest and a vintage aesthetic. They can also be used in larger mixed media pieces as textured layers.
✨ How to Use:
Tear the embossed grid paper into strips and glue them into a junk journal for a textured border.
Use as a background panel in a mixed media piece, layering paint, ink sprays, and collage elements on top.
Emboss onto kraft paper or old book pages for a rustic, aged effect.
Try stitching along the grid lines for added detail.
My examples:


📖 Related Tutorials & Techniques
Looking for more ways to enhance your mixed media backgrounds? Check out these tutorials:
Resist Backgrounds Using Embossing Folders (Another Artsy Karma tutorial)
Embossing with Rubber Bands for Unique Texture (Another Artsy Karma tutorial)
Distress Ink Blending Techniques (From Jennifer McGuire Ink)
Tim Holtz’s Best Ink Blending Tips (For smoother, more vibrant ink application)
🎨 Get Inspired & Share Your Work!
Want to show off your embossed backgrounds or get inspired by other artists? Join these fun art communities:
Craft Challenges:
Share Your Work Online:
• Instagram Hashtags: #mixedmediaart, #artjournalpage
• Facebook Groups: Search for “Mixed Media Artists” & “Card Making Inspiration”
• Reddit: r/mixedmedia | r/artjournaling
💌 Stay Connected!
📩 Sign up for my newsletter to get exclusive crafting tips, tutorials, and freebies!
🔖 Save this tutorial for later – Pin it on Pinterest!
📣 Let’s chat! Leave a comment below – Have you tried embossing backgrounds before?


❤️ If you loved this tutorial, please share ❤️


